The arctic people developed their paddles over centuries, but they never had to find space for a 2.3 m long stick in the luggage rack of an overcrowded train. I have been experimenting with various ways of putting a detachable joint in the middle of a wooden paddle.
The conventional way would be to use a cylindrical tube with matching close fitting rod fixed to the other part, and some form of locking mechanism. This has the advantage that the offset between the blade angles can be adjusted, and the disadvantage that a grain of sand can lock the joint unintentionally. However, the Greenland blades are in line.
I have been experimenting with variations on the scarf joint, an ancient technique for connecting timber beams in line by sawing a long diagonal cut in the connecting ends. The problem is to adapt this to repeated connection and separation. The pictures show two methods which work.
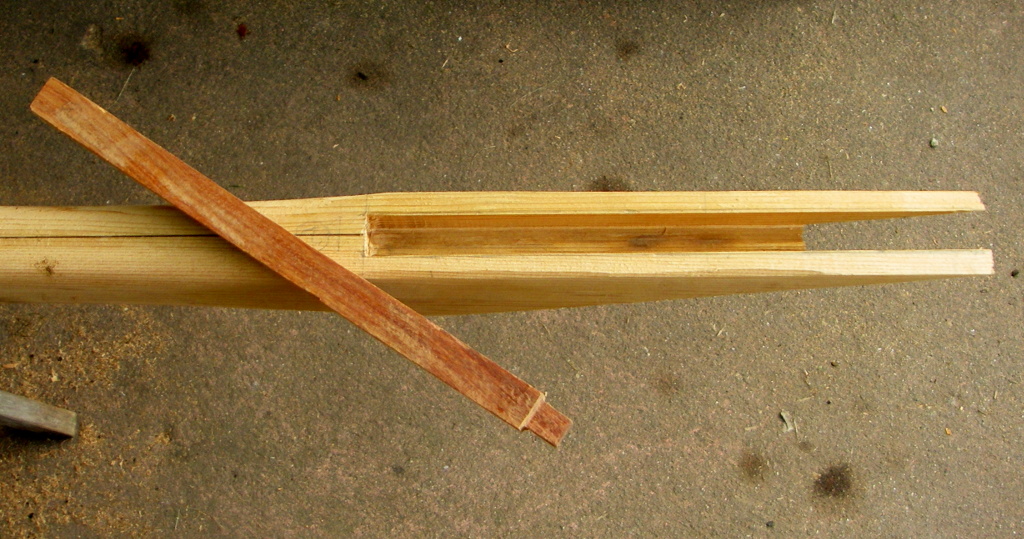
First, a one piece paddle is made in a style which I believe originated in the Aleutian Islands. The loom, that is the centre part between the hands, swells to a peak in a plane at right angles to the blade. This thicker central section provides the bulk for a stronger scarf joint. My paddles are made of laminated western red cedar (from standard architectural cladding planks). The reinforced edges are of Paurosa, an African hardwood and the end protection is African Blackwood. Everything is laminated with West System epoxy. However, one could also make a perfectly good paddle from a single plank of Sitka spruce.
While the paddle is under construction, two square rods of hardwood are prepared, about 12 mm square. I used Paurosa from my neighbour Aziz, who deals in African hardwoods, sustainably. Ash would do just as well probably but the tropical woods do not absorb water, while western red cedar does not react much to water, being of very soft constitution. This gives an assembly which does not swell and shrink as the paddle is repeatedly wetted and dried.
Once the paddle is made, two grooves are cut, one on each side, looking at the paddle blade on edge. The groove is barely larger than the hardwood pins. I do not give exact dimensions, because they are not critical; you can judge from the photos, given that the hand grip is the typical 31 x 34 mm oval.
The next step is to saw the paddle in two diagonally, at about 7:1 length to width ratio. The first picture shows the hardwood pin, the groove and the diagonal cut made after the groove has been milled out, or chiselled out if you are patient. I recommend a Japanese saw for the diagonal cut. They cut on the pull stroke and make a clean and narrow cut.
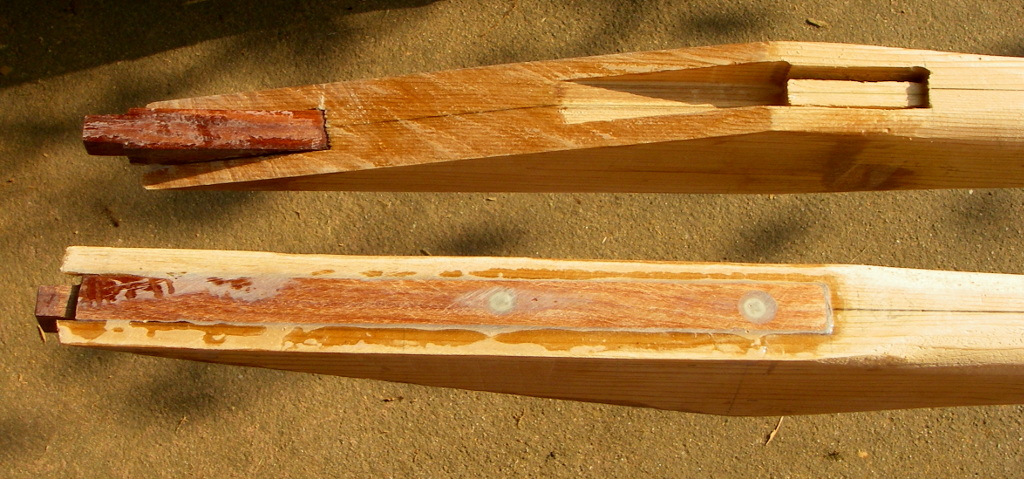
The next picture shows the two pieces cut diagonally. The piece at the bottom shows the pin glued into the groove with epoxy, with two screws to further connect it to the paddle. The upper piece shows how the groove has extended across the cut so that the pin slides into the groove and prevents lateral movement of the ends of the scarf joint. Beyond the end of the groove are two narrow grooves made to take an aluminium channel section, about 12 mm internal size. The pin penetrates into this channel which will prevent opening of the scarf.
The next picture is a perspective, showing the aluminium channel in place. It is held by two stainless steel screws and is not glued. This allows for adjustment to give a snug fit to the head of the pin, which has been filed to fit the channel.
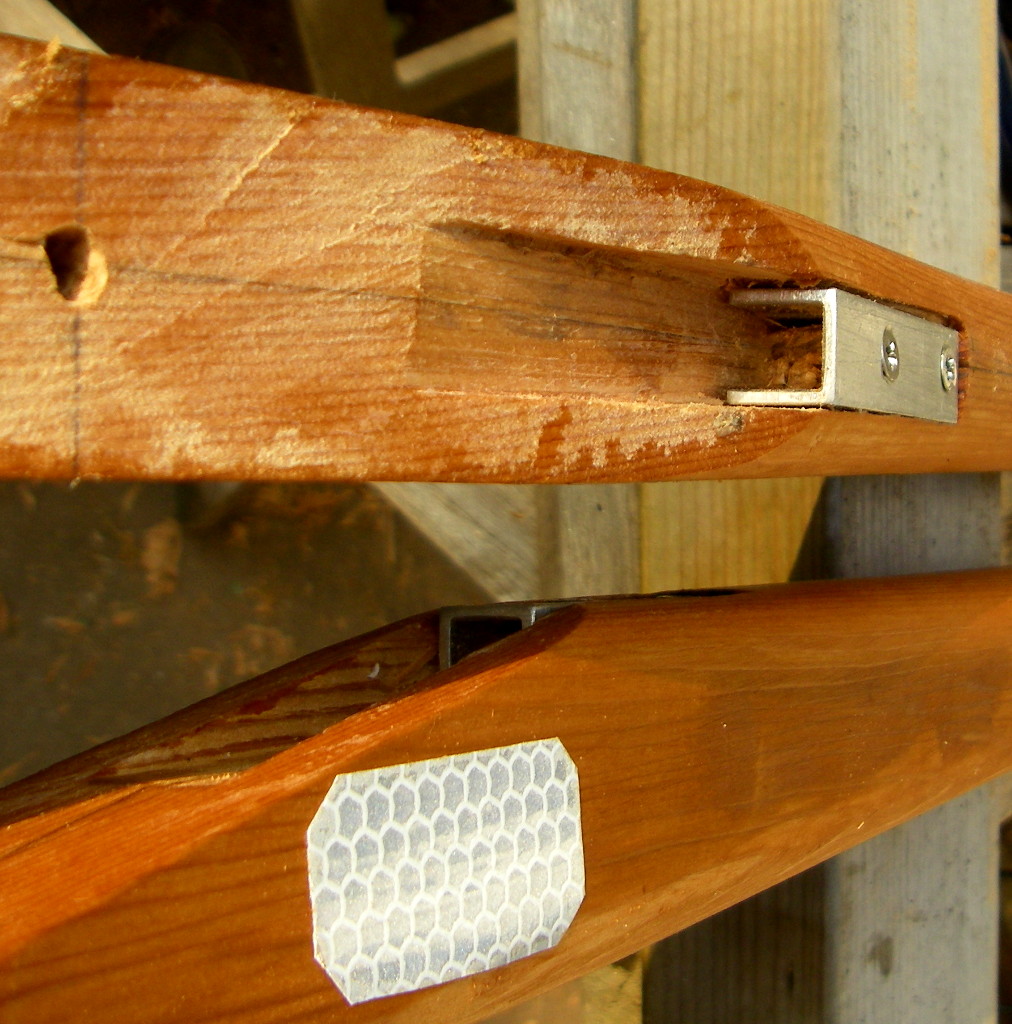
I have added a reflective patch. After all this handwork I do not want to lose the paddle on a night voyage.
The two parts are held together by a stainless steel bolt and self-locking nut. The bolt is set perpendicular to the joint and causes enough friction between the parts that the joint does not slide at all.
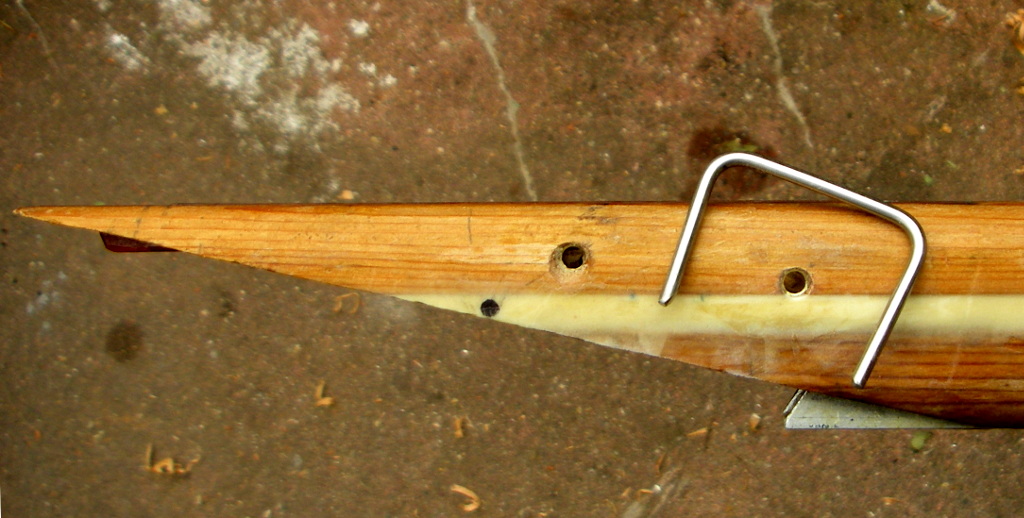
For a reserve two part paddle which may need quick assembly on the water far from land I have made an alternative locking system. This is a 3 mm diameter stainless steel staple, It is shown in the picture below holding the two pieces together with both a cross-piece force and also a longitudinal force to keep the pins firmly in the aluminium channels.

Notice the third hole to the right. This is a parking place for the staple, to keep it handy and secure.
The next picture shows the staple. Its limbs converge, and so do the brass tubes which it fits into, but the tubes converge less. In this way the staple when pushed in exerts a connecting force but has no tendency to slip back out. The parking tube is also convergent with the other tube on its part of the paddle, but the convergence is greater, so the staple will not slip out, but it will not go so deeply into the tubes before it jams, so it is easy to grasp.
Although I intended this design as an emergency paddle, it has proved utterly reliable, with an insignificant flexibility at the joint, so I tend to use it all the time, which will give me a problem if I need in an emergency to use the bolt connection of the other paddle with gloved fingers stiff with cold. Maybe I will fit a staple system to the other paddle also.
The extra weight of the hardwood and metal bits is around 200 grams. These paddles weigh 1100 grams compared with 900 grams for a professionally made one-piece western red cedar paddle.
There is no patent protection or design protection on this joint – it is an open source design. I cannot imagine it will ever be more than an oddity. But I welcome suggestions for other connection systems. One obvious simplification would be to saw the scarf as a V-section, to prevent lateral movement. Then only a flat metal plate would be needed to stop the joint opening.
Anyway, now I can take the bus to the club boathouse in Dartmouth and go for a paddle. The euro paddle with its two spoons stuck on a rod at an angle to one another is still nearly universal kayak club equipment. But the Greenland style is slowly gaining enthusiasts as its many merits get rediscovered.
The two paddle parts also serve as convenient poles for a low bivouac tarp, or a mosquito net, in Scandinavia and Scotland. The strings will not slide down because of the wedge shape of the scarf. For a higher ridge line, the assembled paddle has a swelling in the middle which also prevents ropes from sliding down. The paddle can also be used as a ridge pole, set between boulders or tied to trees. The aluminium channel can be adapted as a bottle opener. Let me know of other uses.
tim