 |
Another way of relaxing paper |
In the previous article I described a humidity generator for relaxing paper, or anything else that becomes sloppy at high relative humidity.
Here is another, simpler method and also a description of how to find out if the humidification process is complete.
The easiest way to damp paper without actually spraying it is to suspend it above a pool of water in a sealed container. Many conservators are reluctant to do this because of the danger of condensation on the lid of the container, which can drip onto the paper. Some use saturated salt solutions to prevent the relative humidity rising too high and some use volatile fungicides to stop the paper from rotting.
The danger from condensation dropping from the lid can be avoided entirely and the risk of mould growth can be minimised by stopping the process as soon as the paper has come close to equilibrium with the high RH in the chamber. This article is mostly about how to determine that the paper is adequately damped, relaxed and ready for further treatment.
It is commonplace knowledge that wet materials in the course of drying out become colder than their surroundings. This phenomenon is used in the psychrometer to measure the relative humidity. It is less common knowledge that the opposite is also true: dry materials exposed to a damp atmosphere become warm. There is no good reason to put dry clothes on the line in a fog, so this elementary symmetry is not so often observed by sensible people.
The phenomenon can be put to use to control the absorption of water by paper and to measure the rate of water absorption during treatment.
If dry paper is suspended in an insulated, sealed box with water in the bottom, the paper will become warm through the heat released by condensation of water into the cellulose fibres. This warmth will, initially, result in a lower than 100% relative humidity at the paper surface. The warmth will also be transmitted to the lid so that it too will be above the water temperature and therefore dew free. The pool of water in the bottom of the box will theoretically become cooler than the surroundings, but this effect is small and depends on the ratio of water to paper.
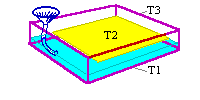
The diagram shows an experiment in which a piece of heavy paper (160g/m2) was treated in this way. The positions where the temperature was measured are marked: the bottom of the container, within the paper and just under lid.

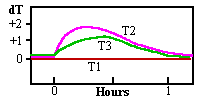
The paper was originally at 50% RH and the whole experiment started with all components at 22C. The temperatures were measured by three thermocouples. The evolution of the temperature after water was poured over the bottom of the box is shown in the graph.

The warming of the paper, T2, caused the RH of the boundary layer of air at its surface to fall from 100% to about 85%. The lid, T3, also was always above the water temperature, so condensation could not occur, at least during the first hour!
It is not always practical to install a thermocouple in an art object, even though thermocouples can be made very small. However, a range of experiments on less valuable materials of similar bulk and absorptiveness could rapidly establish guidelines for practical exposure times. Another technique is to put a thermocouple close to the surface of the object, painted black on the surface towards the object and shiny towards the water. This sensor will react to radiant heat from the object and give a usable indication of approach to equilibrium.
The principles of this and the previously described method can be combined to give many possibilities for controlled relaxation of paper and other absorbent materials.
The thermal effects associated with change of moisture content are of considerable significance and usefulness in conservation. I will return to the theme in the new year with a systematic treatment of heat and moisture.

This work is licensed under a Creative Commons Attribution-Noncommercial-No Derivative Works 3.0 License.