 |
Measuring stress |

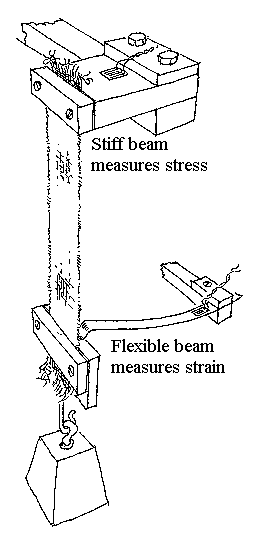
Stress is measured by detecting, with a strain gauge, the slight bending of a stiff bar attached to the piece under test, while the resulting strain is measured by the bending of a flexible beam, that exerts negligible force on the piece under test. A slight correction to the strain is necessary, because the stress sensor does move the top of the test piece slightly.
The measurement of the force, stress, on the piece under test, is made by a device that is deformed as little as possible by the applied force, while the measurement of extension, strain, requires a device that follows the movement of the test piece without affecting its behaviour. The basic technology, however, is the same for both measurements.
The stress measuring device is often called a load cell and is seldom made as shown in the sketch, because more complicated geometries reduce the deformation, improve the linearity of the signal from the strain gauge and compensate better for loads that are not perfectly aligned and therefore twist the beam.
All my illustrations have shown just one strain gauge. Strain gauges are usually used in pairs or in sets of four, glued on both sides of the beam. This increases the signal and also compensates for a variety of interferences such as strain caused by temperature change.
For many laboratory experiments a simple beam arrangement with a pair of strain gauges glued opposite each other near the clamp is entirely adequate. The details of wiring and measurement can be obtained from the two companies named in the previous section.

This work is licensed under a Creative Commons Attribution-Noncommercial-No Derivative Works 3.0 License.